 This is it! The end of our journey! Phase 5 includes putting the glass into the runners and adding all your bedding furnishings. After the break you will read about how I slotted in my glass runners, where I stored my degus during the build and some general information about the job. Firstly, the glass! I orderd my glass from Roman Glass. They were quite expensive and you can probably find a cheaper vendor if you go on a bargain hunt. I chose Roman Glass because we have used them before and they are located very close to where I live - making transport easy. When you order your glass be sure to ask for it "toughened" and "edged", this will increase the cost somewhat but I really don't consider these choices optional.
 To put my glass in the runners, I was able to place the glass into the bottom runner then push up gently on the top runner to raise it. My glass was then able to pop into place. I did this for all 4 pieces. Another job you will want to do before you add your glass is make sure the enclosure is situated where you intend to keep it. I.e. move it into place! If you try to move the enclosure with the glass in, you will increase the risk of breaking your glass. Not to mention it will be much heavier! This is not so important if you are using PVC. Just be sure to take your time, theres no rush :) While I was getting the enclosure ready for degu habitation I had to move them out of their old cage. I let my degus have a space on my floor, I used 4 panels of wood left over from the build to create a small run for them. The space was not great, but it was ok while they were waiting to move in.
Make sure you plan these things before you begin construction, think of every outcome! Be sure to plan where you are going to keep your degus before they move in, where will they're water be? Are you able to easily get to your whole enclosure? There are many things to think about. With your enclosure in place and complete, you can begin the final step. Although I will not go into detail here, you will want to begin adding bedding and accessories to your degus home. I use kiln dried wood shavings, as do many other owners; kiln dried shavings are the most cost effective choice in the UK.
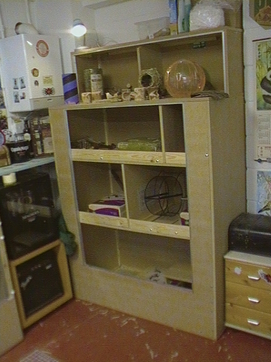
 As you can see in the picture above, my enclosure had some dividers in place. This was because originally I had two seperate groups of degus living in the same enclosure. I also have a balcony on my enclosure. People often say to me that they want to be able to easily interact with their degus. Providing a balcony allows them to come out and greet you on their own terms. I can garuntee they will want to come see you. Hopefully, if your enclosure is high enough above the floor your degus will know not to jump off. This makes an excellent area for you to interact with your goos and not have to worry about escape.
Finally; have fun with your enclosure, have fun customising it, use some of the time you would usually be cleaning around the cage to give your degus extra attention. Good luck! As promised, all the posts are now linked together enjoy! :) Previous
7 Comments
8/21/2012 02:00:15 am
Nice post. I read your post. It’s very simple and informatics. Thank you for sharing..............
oggy
1/22/2014 03:31:53 am
Could you tell me the dimensions of your enclosure?
oggy
1/24/2014 10:31:41 pm
Sorry to bother you again Josh, what's the height of the structure without the top section?
Judas
3/2/2014 04:01:08 am
Hello, I love the balcony idea on your cage! I would do the same on my future build if I didn't have cats in the house. Does the degus fall off the balcony?
Hi Judas, Leave a Reply. |


